
Modifying an AC Adapter’s Output Voltage
April 27, 2010 5:55 pm Cleverness, ProjectsMy IEE clock runs on about 6.5VDC. Why the odd voltage? There are sundry voltage drops throughout the circuit that require the power supply voltage to be higher than the 6V rating for the light bulbs. The problem is that you just can’t find 6.5V AC adapters.
Fortunately it’s quite simple to modify an existing AC adapter to run at the new voltage. I’m sure there are other people who might want to get their own custom output voltages, so here’s a short tutorial.
Disclaimer: if you go ahead with this project, you’re doing it at your own risk. AC line voltage is quite dangerous and you could be injured or even killed. If you get shocked, get medical attention right away: there have been people (often with a previously undiagnosed heart condition) who have received a “small shock” only to drop dead a couple of hours later.
Here is what you need: A switching AC adapter, a flat screwdriver, a soldering iron, an assortment of surface mount resistors, and some time. It is important that the AC adapter is of the new switching style rather than the old transformer style–usually you can tell if the AC adapter feels light and is small enough not to block adjacent outlets, yet has a relatively high current rating for its size. I am starting off with a fairly generic 5V 2 amp AC adapter. Yours will likely use a similar circuit inside.
Quick side note: Why are the new AC adapters so much smaller? First, to provide a given amount of power, a transformer (copper windings around some type of core material) has a physical size that decreases as the frequency goes up. A transformer designed to operate at 60Hz or 50Hz is going to be much larger than a transformer that is designed to operate at 15KHz. Since the frequency of the AC line is fixed, these new AC adapters work by converting the input AC to a much higher frequency. There is also a little circuit that looks at the output voltage and tweaks the converter circuit to maintain a constant output voltage. Thus, the new AC adapters have much better regulation than the old styles. As an added bonus, this type of design can operate at 50Hz, 60Hz, 120V, or 240V! To get into more detail, there is a feedback circuit that compares the output voltage to a voltage reference, then sends an error signal to the converter circuit at the primary side of the transformer. The error signal is isolated (for your safety) using an optocoupler.
To take apart the AC adapter, crowbar the plastic halves of the case where they meet in the middle. Try to find the little plastic catches that keep the halves together. You might need two screwdrivers to get them to come apart. Inside you can see a little circuit board with components and some wires.
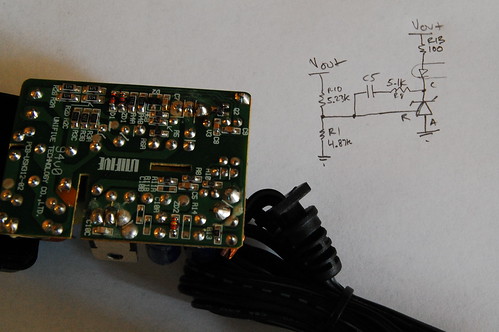
To modify the output circuit, the feedback circuit must be modified. I sketched out the circuit and learned that this particular AC adapter uses a clone of the TL431 reference+error amplifier circuit (which is the weird zener-diode looking thing in the photo above). This particular device, the AM431, has an internal 2.495V reference. The output voltage is divided down so it can be compared with 2.495V, and this is done with a resistive divider formed by R1 (4.87K) and R10 (5.23K). R10 goes to the output voltage, and R1 goes to ground. In this design, I can only modify R1 since R10 (acting in combination with the feedback capacitor) also determines the loop compensation pole (no need to mess with this). Based on my reverse-engineered schematic of the secondary side, the formula for the output voltage is Vout = (1 + R10/R1) * 2.495. Replacing R1 with a 3.3K resistor should bump up the output voltage.
It’s easier to remove a surface mount resistor using two soldering irons, but if you only have one, you can blob a bunch of solder on top of the resistor to wet both sides, and then flick it off with the iron. Be careful to get rid of any splattered solder since it could cause some dangerous short circuits.
You can test it before putting the case back on by plugging it into a power strip that has a circuit breaker and a switch–turn it off first! Connect a multimeter to the outputs with alligator clips, and use one hand to switch on the power and check the voltage. If you want to be a little extra safe you could plug the power strip into a GFI outlet. The safest approach (especially if you want to take measurements on the AC line side of the isolation barrier) is to connect the whole rig to an isolation transformer. Once you’ve confirmed that it works, put the case back together and mark the label with the new output voltage. If the output voltage is higher, you will need to decrease the current rating proportionally. If you’re decreasing the output voltage, you shouldn’t increase the current rating since internal components may have a pretty low maximum current capability.
If you want more information about the TL431 (which is a really neat little device that could be useful for lots of other circuits), check out this application note: Designing with the TL431.