
A Reproduction AdLib Sound Card
July 22, 2016 7:13 pm ProjectsEdit: Someone who goes by W9EO has recorded assembly videos on YouTube which you may find helpful for building this card. He is also selling completed cards if you don’t want to solder it yourself.
Growing up, I used to play some games on an AST 286 computer, including Commander Keen, Wing Commander, and a few others.
Sound in those days was primitive compared to modern machines, but I still have a soft spot for the bleeps and bloops of the OPL2 synthesizer cards (which includes the AdLib).
Recently I have been fixing up an IBM XT (with original CGA card!) and I needed a sound card. It turns out that early sound cards like the AdLib or the Sound Blaster are quite expensive on the used market, so I thought I’d make a clone of the AdLib sound card (1990 version). Being me, I couldn’t just make an electrical equivalent. It had to look as close as possible to the real thing.
Here it is.

Compare it with the original 1990 version of the AdLib sound card.
I started with Sergey’s OPL2 card and corrected some differences between it and the genuine AdLib card. Since I don’t own a physical card, I found photos on the net of the front and back of the card to use as a reference. To make sure everything matched up exactly, I figured out the design grid of the original and duplicated the traces and component placement as closely as possible. All the library footprints are custom designed to match!
The KiCad design files are available on GitHub. Mouser part numbers are embedded in the KiCad design but they are also included in the table below. The Yamaha OPL2 chipset, the YM3812 and YM3014B pair, can be found at various sources online. They were socketed on many older Sound Blaster cards, so I suspect quite a few were recovered by the scrappers.
| Q | Designator | Description | Mouser Part |
| 1 | J1 | CONN_01X05 | 490-SJ1-3553NG |
| 1 | U6 | YM3812 | |
| 11 | C4,C5,C24,C2,C25,C20,C19,C26,C1,C14,C16 | 0.1uF | 581-AR215C104K4R |
| 1 | D1 | D | 512-1N4148 |
| 1 | Q1 | 2N3904 | 512-2N3904BU |
| 2 | R1,R13 | 8.2K | 291-8.2K-RC |
| 6 | R2,R3,R6,R7,R11,R12 | 2.2K | 291-2.2K-RC |
| 1 | R4 | 12K | 291-12K-RC |
| 4 | R5,R9,R10,R16 | 10K | 291-10K-RC |
| 1 | R8 | 1.5K | 291-1.5K-RC |
| 1 | R14 | POT | 652-91A1A-B24-D15L |
| 3 | R15,R18,R19 | 10 | 291-10-RC |
| 1 | U1 | 74LS109 | 595-SN74LS109AN |
| 2 | U2,U3 | 74LS138 | 595-SN74LS138N |
| 1 | U4 | 74LS245 | 595-SN74LS245N |
| 1 | U5 | 74LS04 | 595-SN74LS04N |
| 1 | U7 | YM3014B | |
| 1 | U8 | RC4136 | 595-RC4136N |
| 1 | U9 | LM386N | 926-LM386N-4/NOPB |
| 1 | C18 | 220uF | 647-TVX1C221MAD |
| 4 | C7,C6,C9,C8 | 4700pF | 581-AR211C472K4R |
| 1 | C12 | 1000pF | 581-AR211C102K4R |
| 1 | C17 | 0.047uF | 581-AR215C473K4R |
| 1 | C13 | 270pF | 594-S271K43SL0N6TK5R |
| 6 | C23,C21,C22,C11,C3,C15 | 10uF | 581-TAP106M025CRW |
| 1 | C10 | 4.7uF | 581-TAP475K016SCS |
| 1 | MNT1 | CONN_01X01 | 534-9202 |
To install the card in a computer, you’ll need to get a Keystone 9202 bracket. The KiCad layout includes a drawing showing where the holes need to be punched in the bracket. I recommend using a hand-held sheet metal punch with a 7mm or 9/32 die. You could also drill it but the punch makes a much cleaner hole.
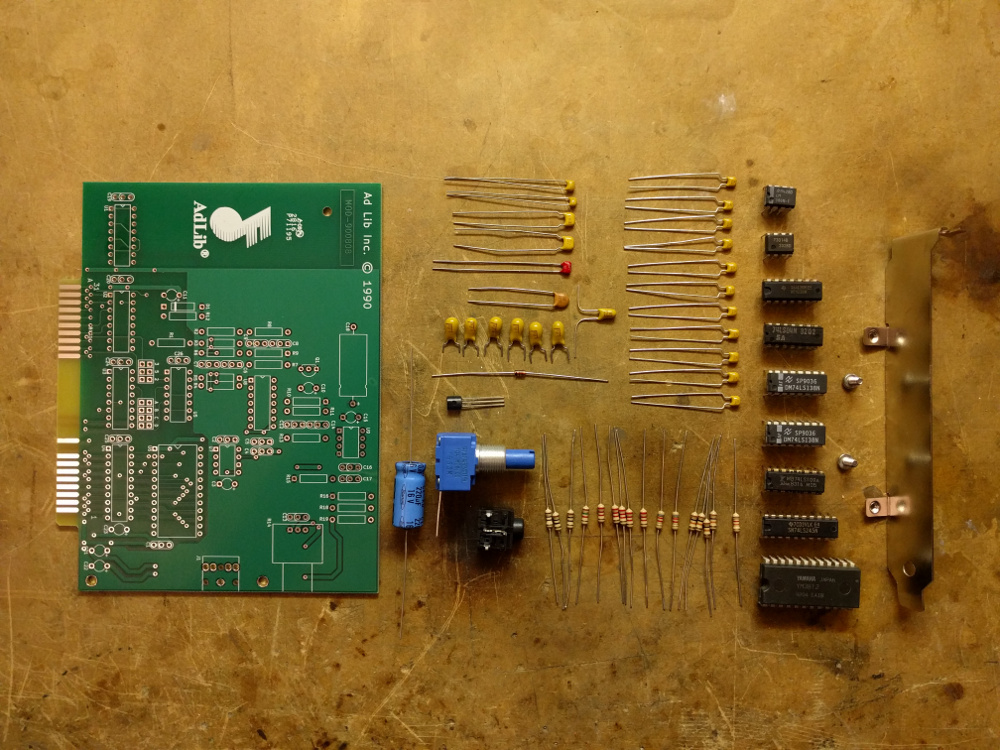
Here’s a bonus photo showing all the parts laid out before soldering. The components were chosen to match the colors on the original card.
Richard :
Date: July 27, 2016 @ 4:12 pm
With a world wide market of… several! I need a 486 DOS6 machine to play Duke Nukem Plutonium Pack. I miss duke saying, “What are you waiting for? Christmas?”. Thanks for the nostalgia, Eric.
shock__ :
Date: January 8, 2017 @ 8:02 pm
Wow … this is bad, I can already see this card being sold as the real thing – being sold at 500% the material costs by scalpers. Sorry, but this does more harm than it helps if it’s not properly marked as a replica (little details being off [placement of the copyright notice, slightly different silkscreen] just won’t cut it).
eric :
Date: February 3, 2017 @ 6:19 pm
Yeah I went back and forth on this one, especially since the design files are available for anyone to modify. Adding “replica” on the silkscreen is just too easy for someone to remove, either from the design files or the Gerbers. I know it’s harder to see, but subtler differences are probably the most effective. Let me know if you have any ideas about a better solution.
Dimitri :
Date: January 18, 2017 @ 4:20 am
Hi Eric.
That was an amazing job!
Where did you get your pcb made?
Thanks
eric :
Date: February 3, 2017 @ 6:13 pm
Advanced Circuits (33each.com)
Also Eric :
Date: February 24, 2017 @ 11:22 pm
Hey I’m really excited about this project and I don’t quite know my way around kicad. Is there any way I can get a Part List?
eric :
Date: February 25, 2017 @ 1:08 am
I’ve updated the post to include the bill of materials.
Mike :
Date: July 17, 2017 @ 2:52 pm
Hi, is there any chance we can buy one? 😉
Chris :
Date: November 11, 2017 @ 4:16 pm
Hi,
is it possible to buy such a adlib-kit? Also delivering to germany 😀
This is kind of project, not like these Dreamblaster S1 and S2 builts with 0,5 MB of memory… stay original – kind of 😉 Two thumbs up for your adlib-project…
eric :
Date: November 14, 2017 @ 11:49 pm
No kit, unfortunately. It should be simple enough to send out for boards given the files I’ve provided.
Chris :
Date: November 17, 2017 @ 5:00 pm
Hi Eric,
thank you for the reply.
But one question.
Is it possible to obtain a raw Adlib-platine from you? Maybe three pieces?
Thankx.
Chris
Arne :
Date: March 6, 2018 @ 9:51 pm
Love the project! My boards are on their way from Aisler. One question: what are the empty pads A-D and 3,5,2 for?
eric :
Date: April 1, 2018 @ 8:10 pm
They are for I/O address and IRQ jumpers which were never used. 3,5,2 correspond with IRQ 3, IRQ 5, and IRQ 2. IIRC only the internal OPL2 timers used the IRQ line, but the stock card doesn’t connect any of them.
The A, B, C, and D jumpers correspond with:
A – 0x219
B – 0x288
C – 0x318
D – 0x388 (the default)
0x388 is hardwired with a trace, and that’s what most Adlib support is written for.
Toughdev :
Date: May 21, 2018 @ 5:52 am
There is a typo in the BOM. C18 is not 10uF. It is 220 uF instead (647-TVX1C221MAD)
eric :
Date: May 22, 2018 @ 10:34 pm
Toughdev–thanks, it’s fixed now.
Netanel :
Date: July 2, 2018 @ 8:04 pm
Just made my own.
Thanks you very much Eric!
Martín Drot :
Date: April 26, 2020 @ 10:33 am
Hello, I’m interested to buy some kits to mount do you sell them, which is the cost. Thanks in advance and great job!
eric :
Date: May 5, 2020 @ 3:32 pm
I don’t sell kits, sorry.
Z :
Date: September 21, 2020 @ 7:51 pm
I wonder would it be much more difficult to create AdLib card in PCI version, not just ISA?
Julian :
Date: July 17, 2021 @ 10:37 pm
HI Erik, i am building this one and its hard to get the tantalum caps, do you know if its ok to replace those with Mlcc or polymer ones ? Any input will be really appreciated.
Thanks !!!
eric :
Date: July 17, 2021 @ 10:40 pm
The capacitor choice isn’t critical. You can replace it with polymer, MLCCs, whatever you want.
WimWalther :
Date: October 15, 2021 @ 8:38 pm
So I take it that you ultimately changed the silkscreen to remove the AdLib logo and add the ‘replica of..’ text? I’m viewing the gerbers right now and thats what I’m seeing.
Ayan :
Date: November 3, 2023 @ 4:59 am
Will there be any Audio quality or noise issue if I use sockets for all ICs? instead of soldering directly….