
A Miniaturized Discrete MC1466
September 28, 2014 6:03 pm Cleverness, ProjectsUpdate: the bill of materials is now available. You can order boards from OSH Park using this direct link. Last time I ordered, it cost me a grand total of $3.55 for three boards (free shipping), and it took about two weeks for the boards to arrive.
I screwed up. My bench power supply is a Lambda LPT-7202-FM triple output (0-7V @ 5A, 0-20V @ 1.5A, 0-20V @ 1.5A), and I blew it up by trying to desulfate a lead-acid battery. The idea is to take a dead lead-acid battery and recondition it by charging it with a current-limited 15V source while feeding it high voltage pulses. I had a diode connected in between the battery and the bench supply to protect the power supply from the high voltage pulses. Well, the diode failed. It was a sad day.
Fortunately the service manual for the supply is available online. I traced around the circuit and found that two of the power control chips were fried, but everything else seemed OK–I could move the one remaining functional chip from channel to channel to confirm that. The control chips were marked with the Motorola logo and a Lambda house part number: FBT-031. A forum thread indicated that the part was actually the MC1466. Sadly this chip is long out of production and a bit hard to find, although a popular auction site had several listed from a seller in China (but who knows if the parts were counterfeit or not).
The datasheet has the full schematic including resistor values, but how do I know that it actually matches the chip? Since the IC is packaged in a ceramic DIP, I followed reader Uwe’s suggestion and took a chisel to one of the dead parts.
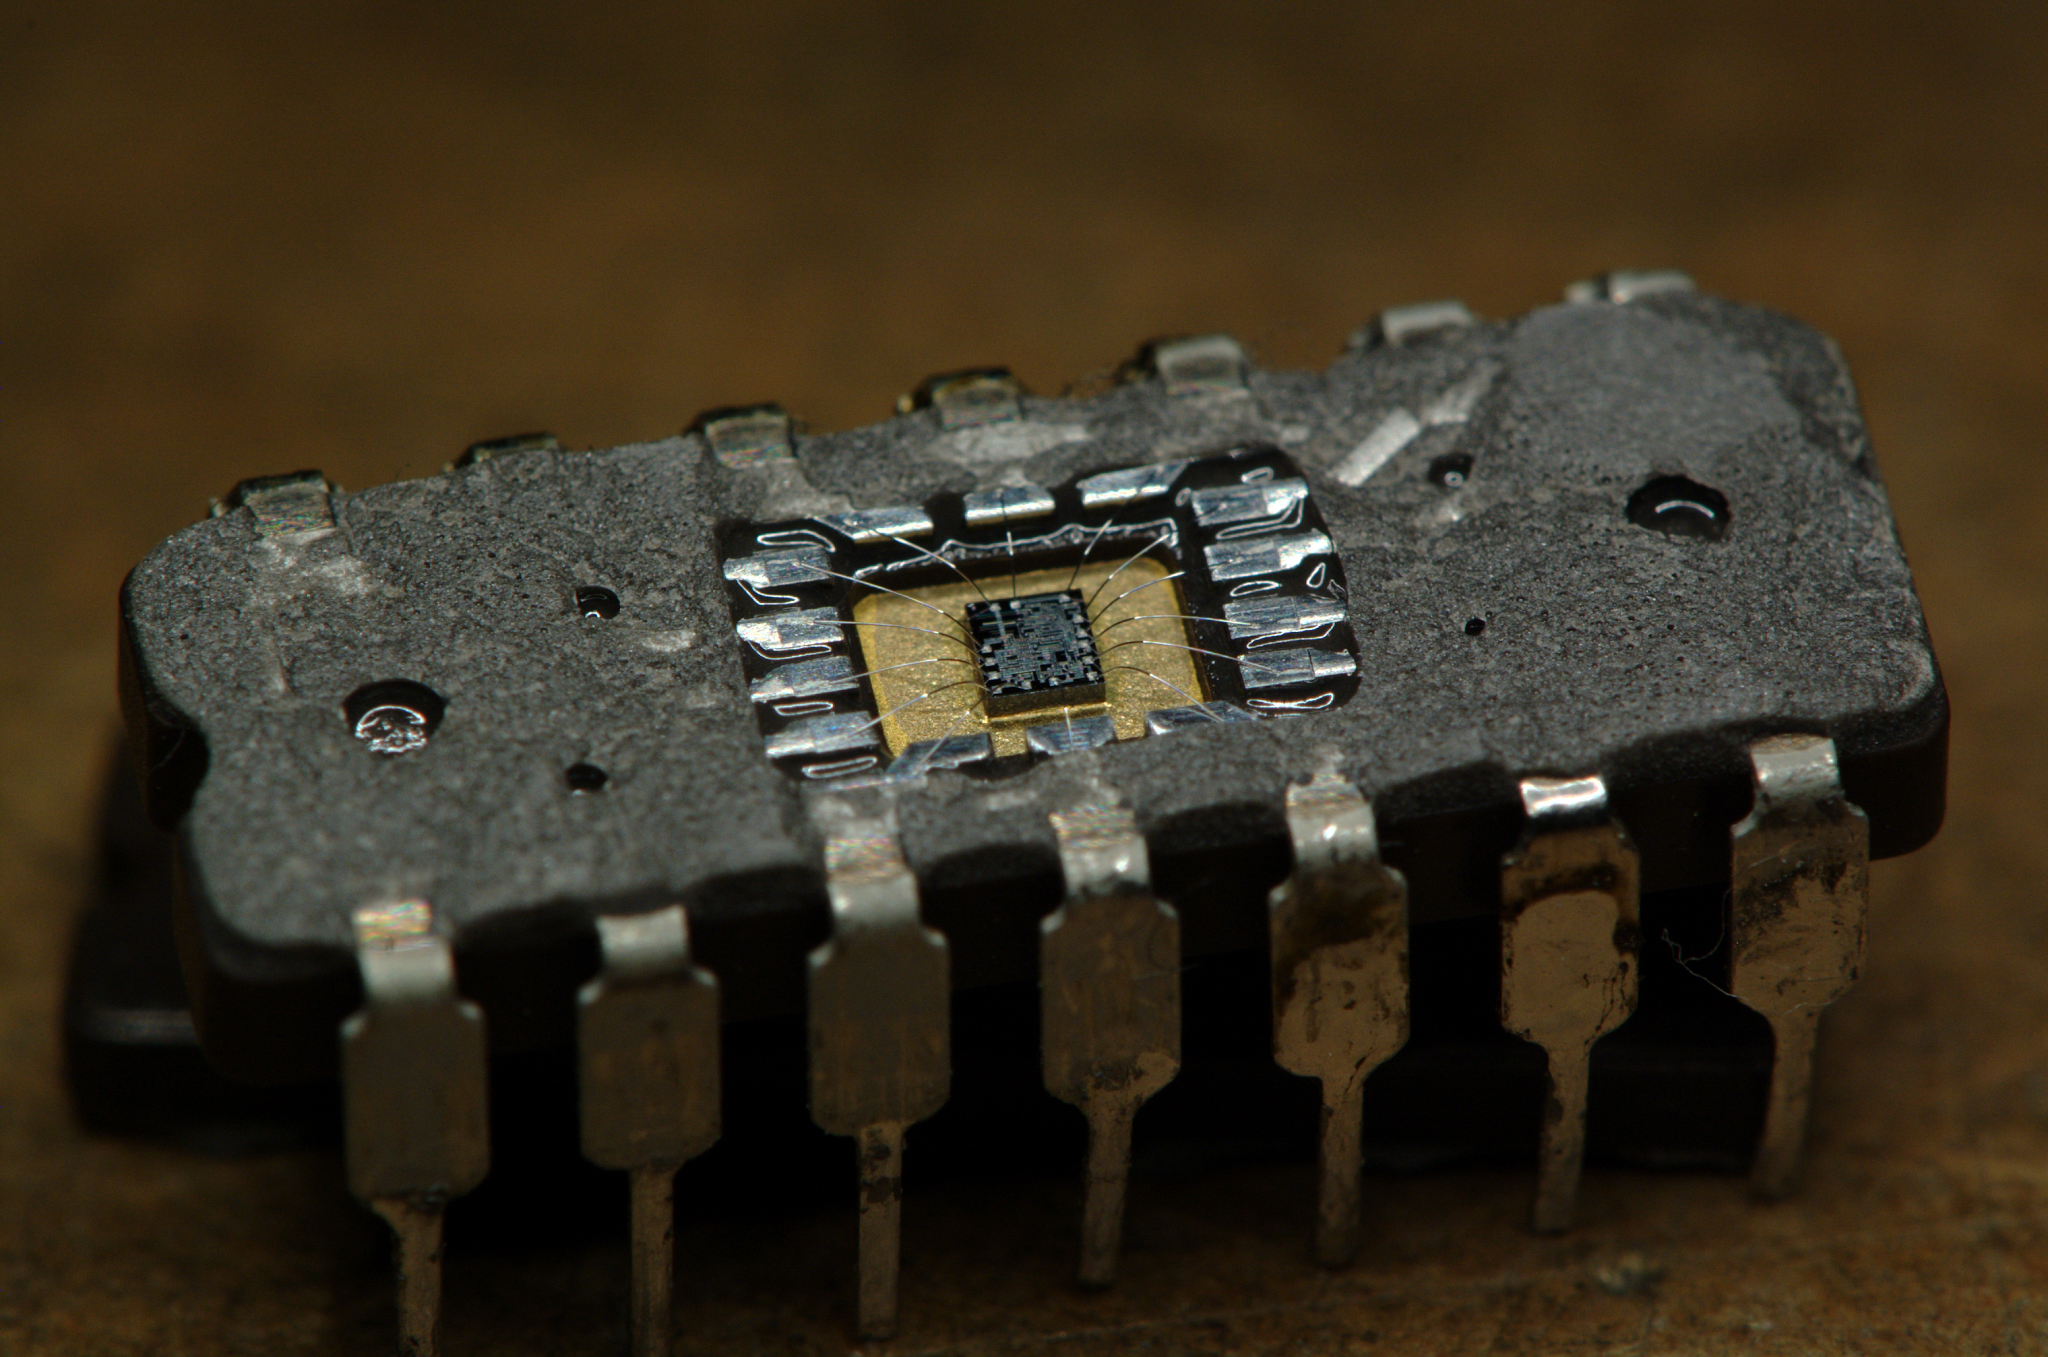
It worked and nothing was damaged! The die looks like this:

I went over the layout and it matches up with the datasheet schematic. Those funny round elements are actually zener diodes. You can see the long skinny resistors and the lateral PNPs as well as the NPN transistors and diodes. Below is the schematic (click to enlarge):
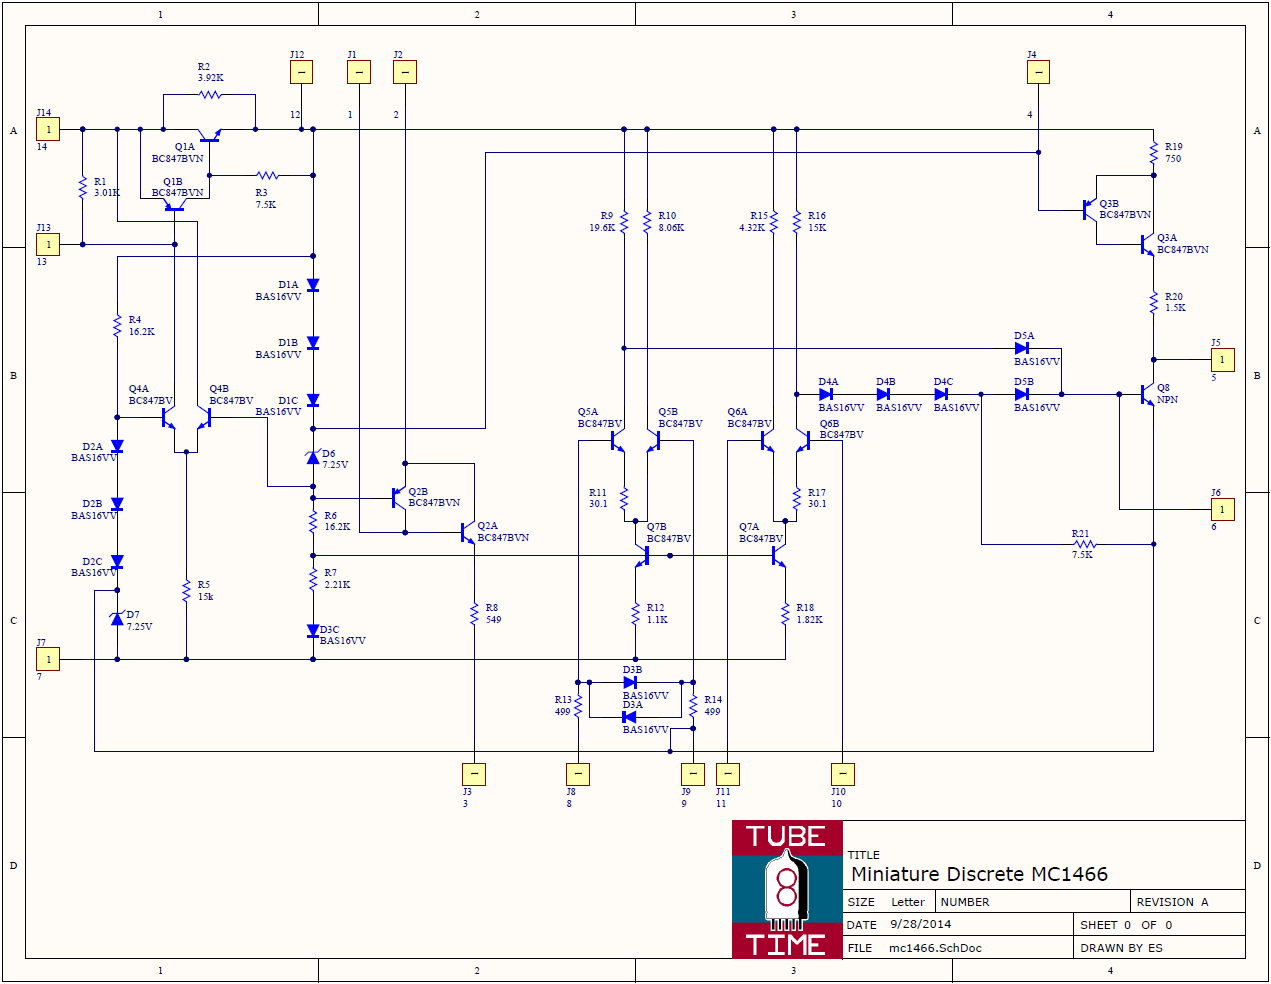
The IC design is pretty archaic. I’d say it dates to the late 1960s. There are fairly ordinary differential amplifiers, but the current mirrors are really strange, and the voltage reference circuit uses Zener diodes and series-connected diodes instead of a temperature compensated bandgap reference. The two Zener diodes (the only round features on the die) are probably just reverse biased NPN transistors, using the ~7.5V avalanche breakdown of the base-emitter junction. The lateral PNPs have a much higher breakdown voltage so they can’t be used this way.
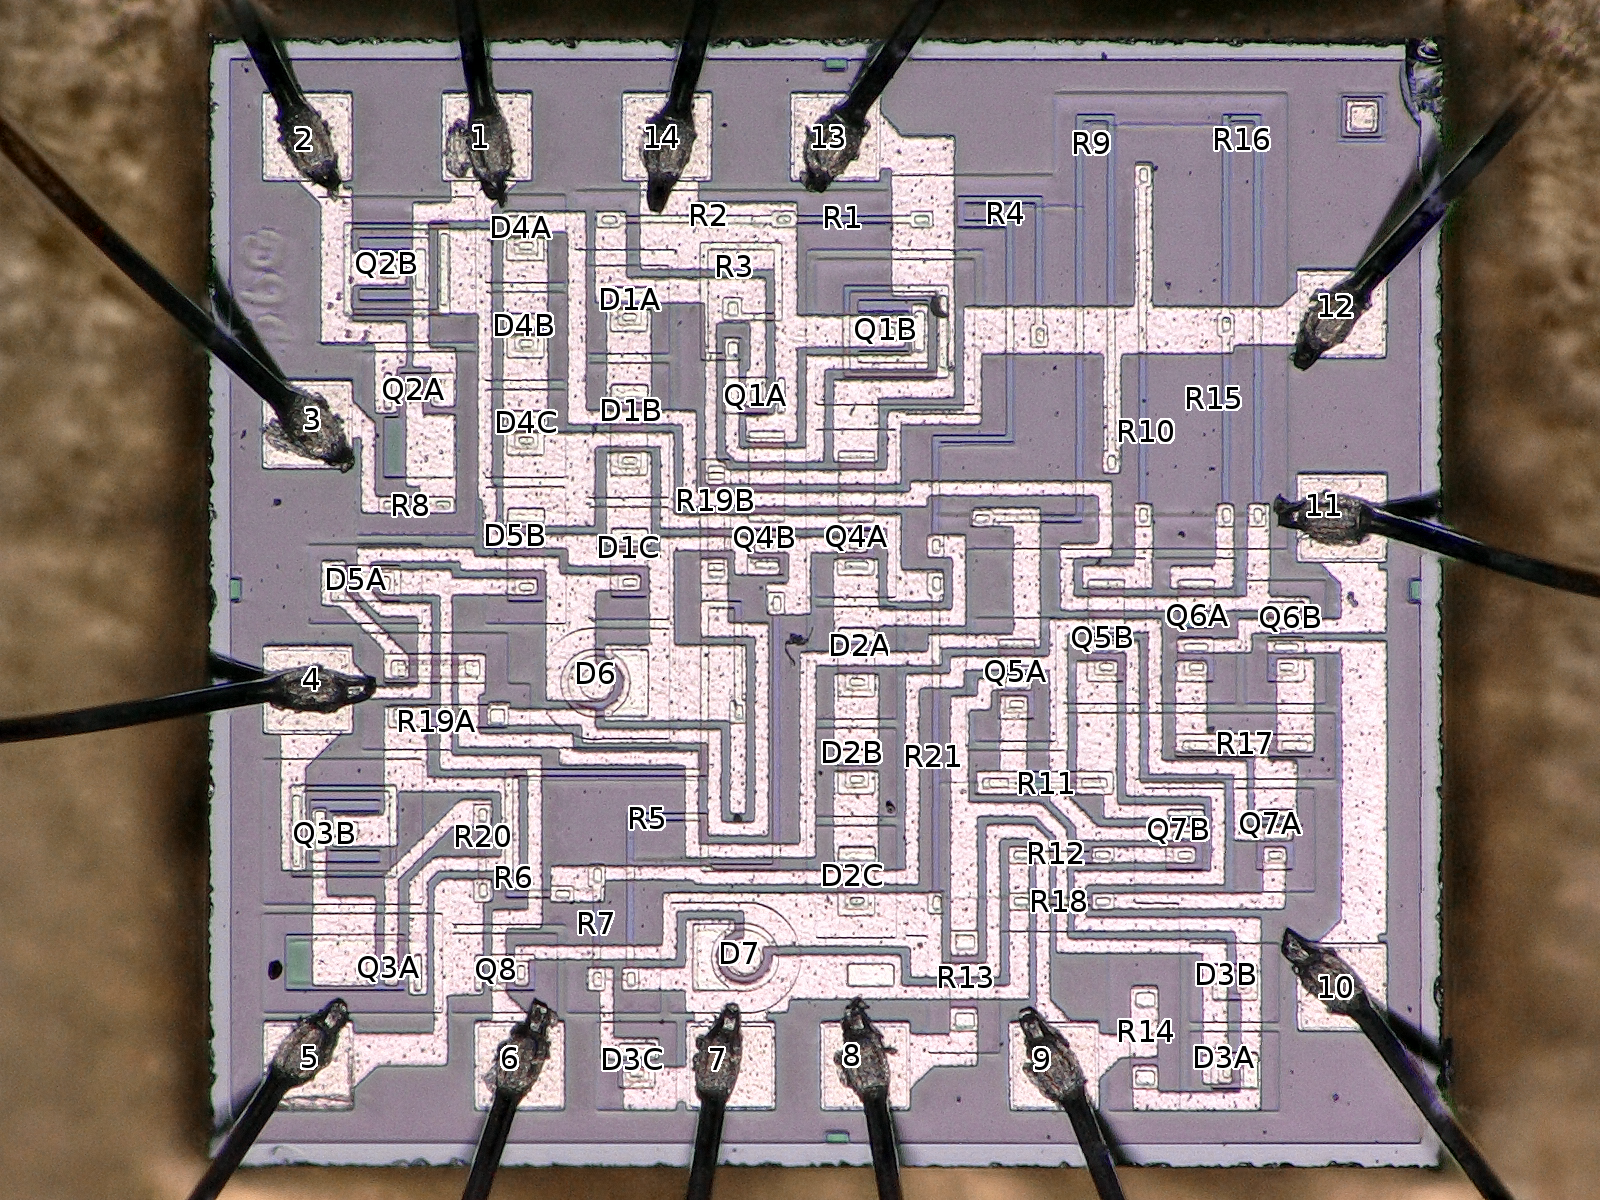
Here’s a labeled die photo (click for a larger image) so you can see where each of the components are. The component designators match up with my schematic, not the IC datasheet schematic.
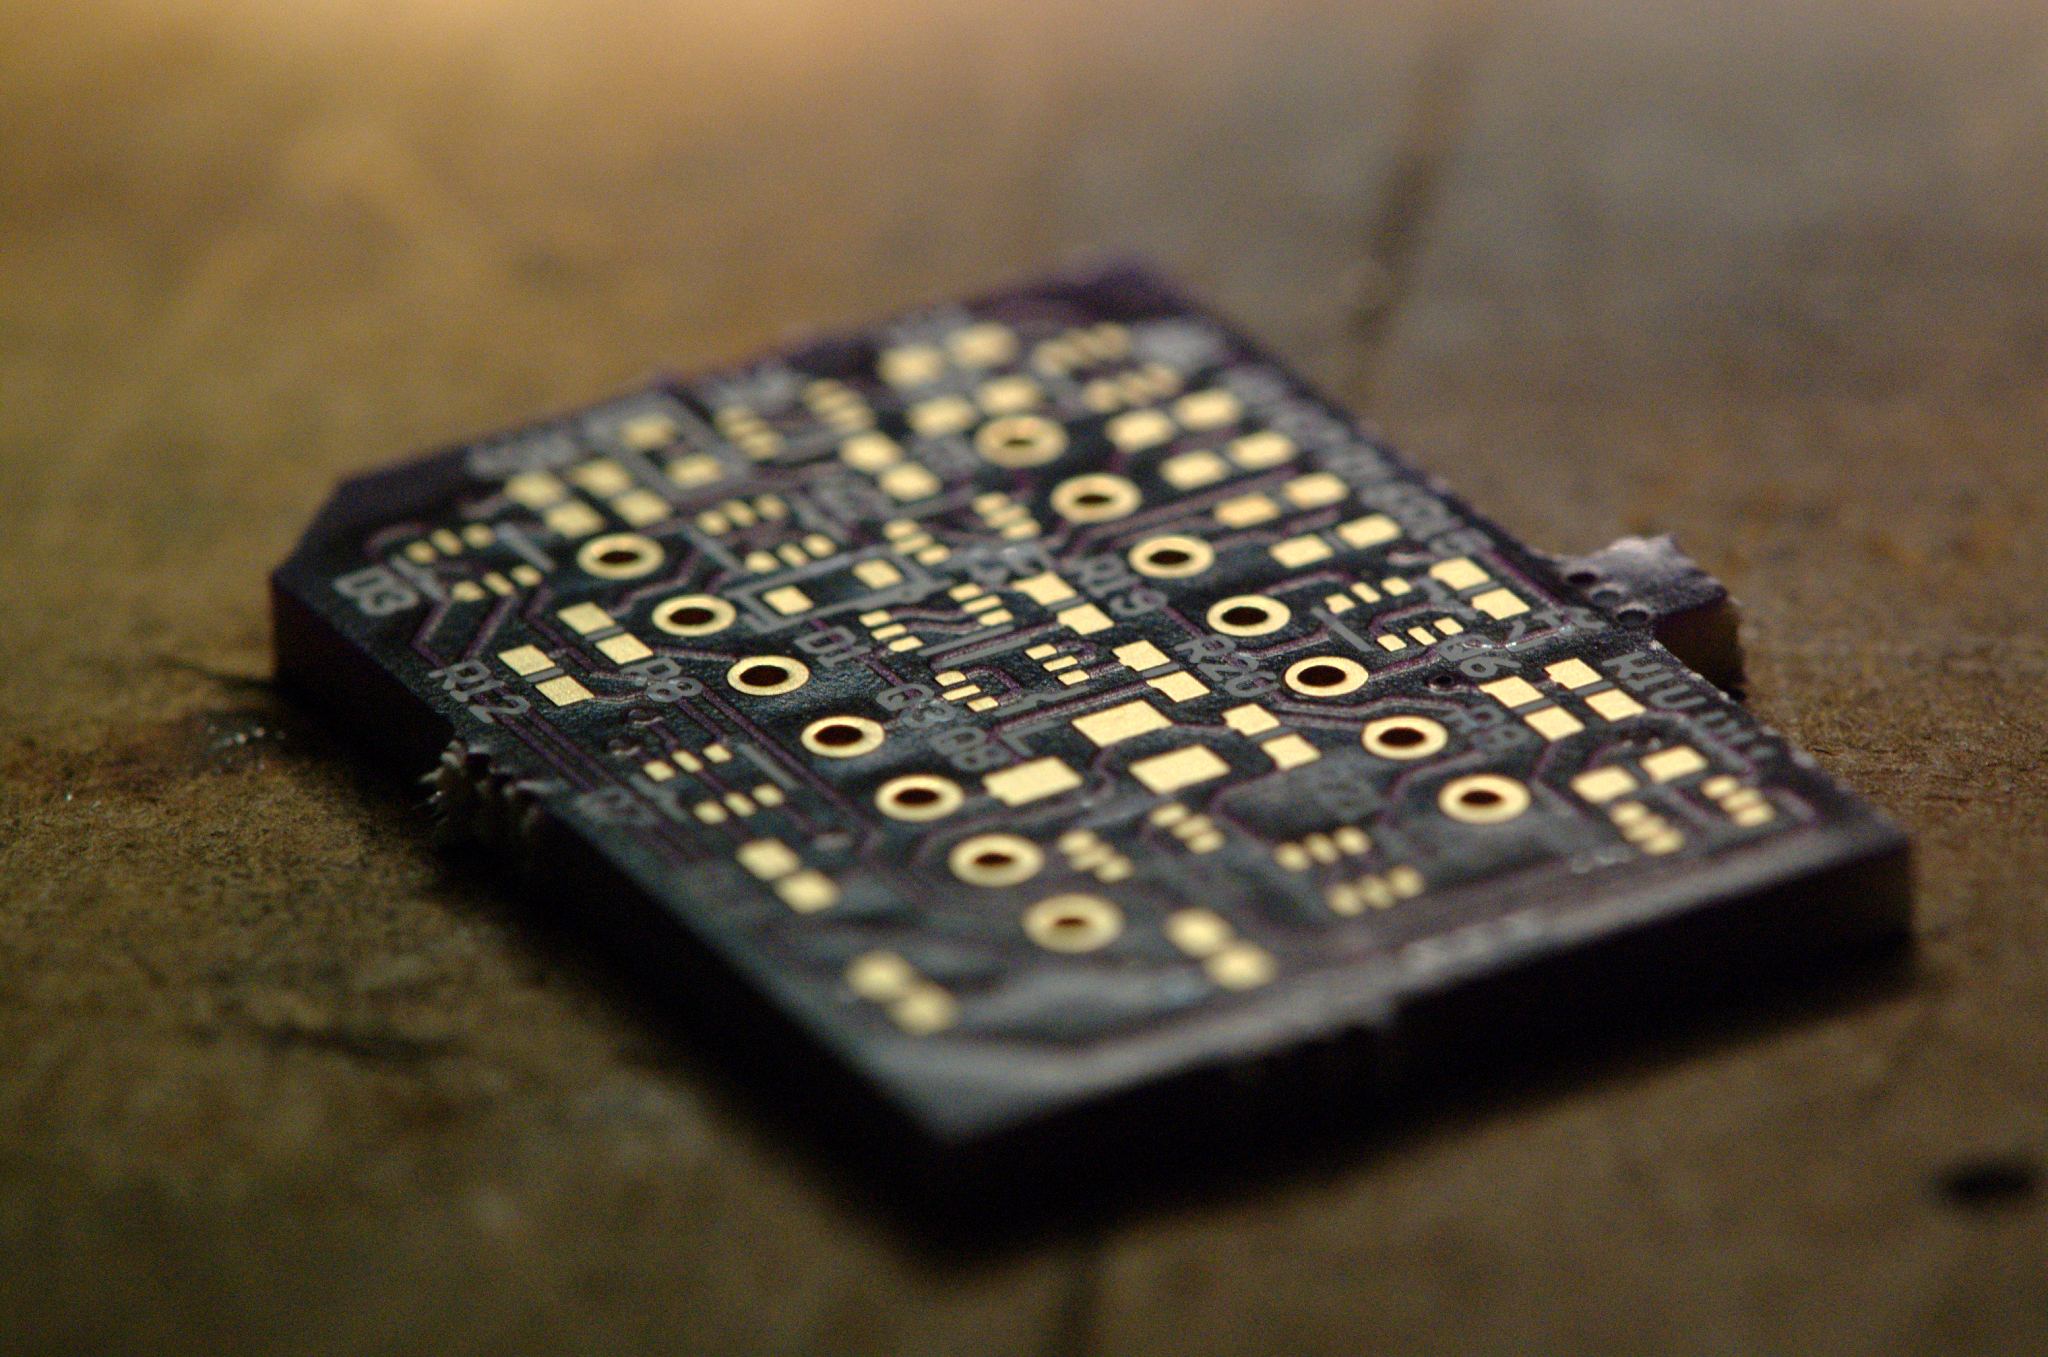
The device is simple enough that I decided to build a really small PC board with discrete components. I found that the BC847BVN (NPN/PNP dual transistor), BC847BV (dual NPN), and BAS16VV (triple diode) came in a really tiny SOT-563 package. Believe it or not, this is not the tightest or smallest layout I’ve done. This is a 2-layer board with 6 mil traces and 6 mil spaces.
To give you an idea just how small the SOT-563 is, take a look at the first BC847BVN I soldered:
![]()
The part is 1.05mm x 1.05mm! I had to use a very fine soldering iron tip and a microscope. Another trick is to use really thin solder (I used 0.38mm). As you can see, the resulting board is just slightly larger than the original DIP IC:
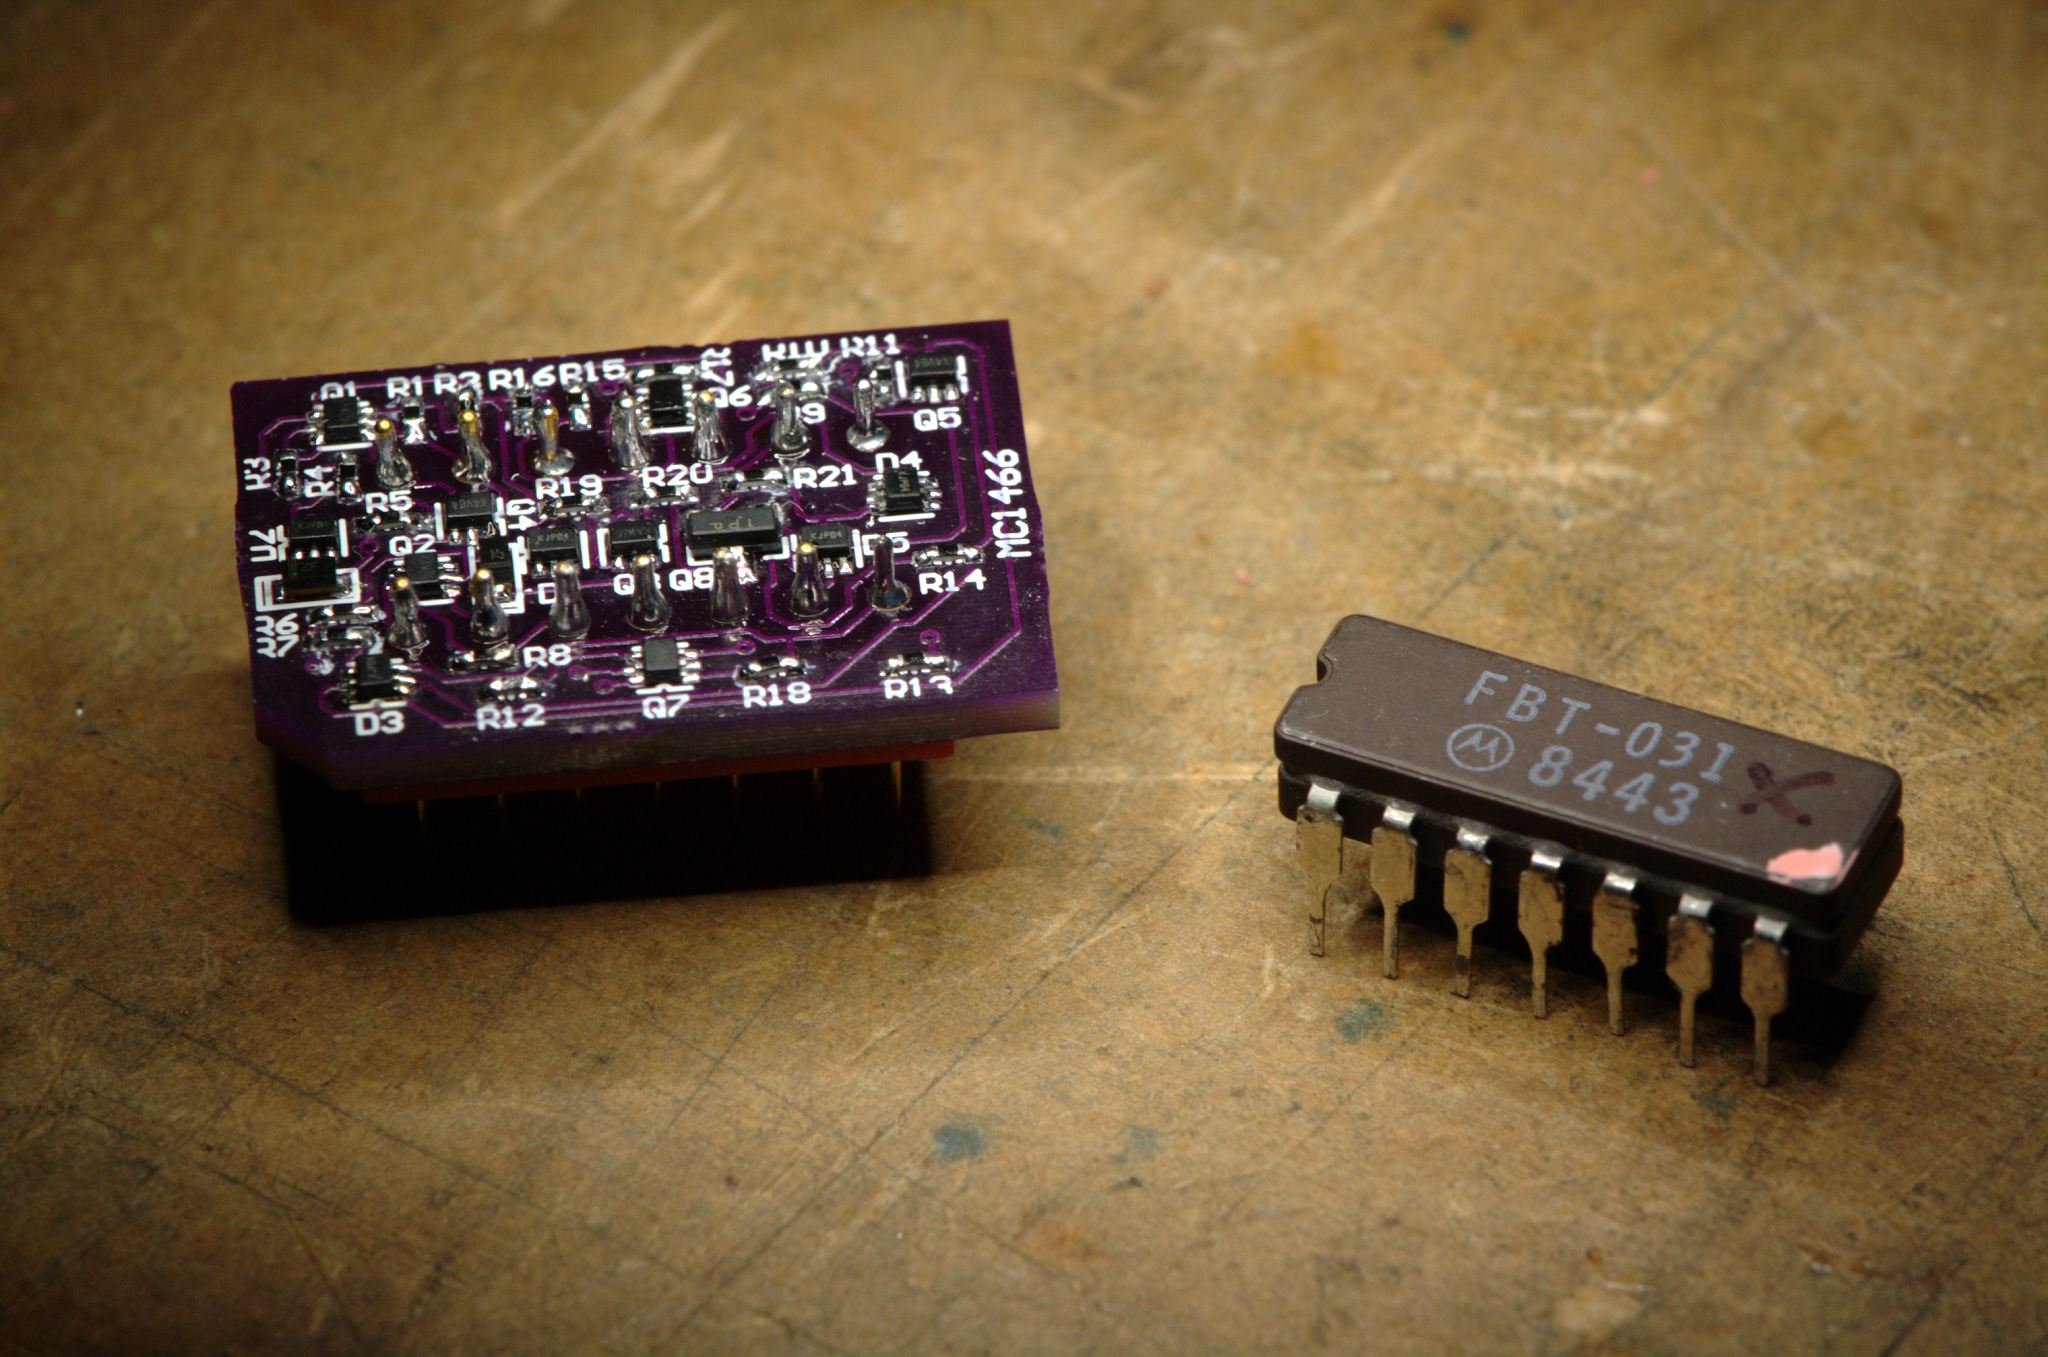
It really is pin compatible. I plugged two of them into my Lambda supply and now it works perfectly!
Richard :
Date: September 29, 2014 @ 8:51 am
That is amazing. And what a coincidence. I just purchased a Lambda power supply LPT 72202, almost identical to yours. Good to know there is a means to repair it, should I blow it up. UPS tried their best to crush and mangle it this supply too. A couple of minutes with a crescent wrench and a mallet and it looked as good as new. No, it didn’t. But, it was working like new! I love the IC breakouts that you are making. Amazing. Simply amazing.
Kevin :
Date: September 29, 2014 @ 1:06 pm
I’ve seen desulfators that are standalone devices that attach with two wires to the battery, and nothing more. They charge from the power in the battery, and send it back as a HV pulse into the battery. No risk to any of your benchtop electronics.
eric :
Date: October 1, 2014 @ 5:35 pm
This battery was so dead there’s no way it could power the desulfator by itself, but I have seen those ones before.
Paul Rako :
Date: October 4, 2014 @ 8:43 am
Great stuff, there are also battery recovery methods that put a huge current into the battery to supposedly blow off the sharp points of lead that form, that was for conventional flooded batteries though. I have gotten my Harley batteries somewhat recovered by just charging them for a couple days, at a point where they are a little hot, but not boiling electrolyte. They then last for a while.
Richard :
Date: October 22, 2014 @ 10:29 am
So Eric. Got a spare board and kit of parts I can buy from you? I blew up channel one on my power supply. Do not use it to run the heater in a CRT. Apparently enough HV leaked back to knock out the power supply.
eric :
Date: November 1, 2014 @ 12:34 pm
Richard: I emailed you. For CRT heaters, I just use a 6.3VAC transformer. Works really well for tubes that tie the cathode to one leg of the heater, or tubes that suffer a cathode to filament short.
ItsThatidiotAgain :
Date: February 7, 2015 @ 4:41 am
Most impressive MC1466 build. There are still a few of these old chips about on the interweb, but a lot of this stuff is becomeing unobtanium. Hats off and 1000 extra geek points for this amazing effort.
I did spot at least one supplier claimong to have “new stock” of the MC1466..
http://www.ebay.co.uk/itm/1pcs-MC1466L-MC1466-PRECISION-WIDE-RANGE-VOLTAGE-AND-CURRENT-REGULATOR-/181039901431
Get them while you can…
Brian :
Date: February 24, 2015 @ 7:18 pm
The MC1466L is not in current production – the Chinese have reverse engineered their fakes. The MC1466L’s on eBay are in ceramic packages – only the MC1566L was ever in the CERDIP package. Your original, if in a ceramic package, is indeed a MC1566L, same electronics, better spec, and MIL-cert’d back in the 70s. Only MC1466Ls were produced after 1980, and only in the Plastic Dip package. Your discrete build is IMPRESSIVE!
Keith :
Date: March 3, 2015 @ 3:31 pm
Fantastic! Two questions:
1-did you consider a double-sided load so you could make it even smaller?
2-any performance issues since now the differential pairs are not matched?
eric :
Date: March 19, 2015 @ 5:17 pm
Answers! 1) Originally yes, but the vias took up too much room and made the board larger. 2) They weren’t well matched on the original IC either, but wherever possible I used dual transistor devices for the diff pairs.
Roger Albert :
Date: January 27, 2017 @ 5:32 pm
Hi Éric,
That’s really an incredible job! Well done…I was wondering if you could kindely send me the schematics of the minutarized discrete MC1466L. It can’t be enlarged anymore an I can not see the schematic details.
Thanks Roger
GianLuigi Piacentini :
Date: February 25, 2018 @ 7:18 pm
I suppose You are aware that at http://chemelec.com/Projects/MC1466/MC1466.htm there is another discrete version, based on thru-hole components.
It is probably easier to build, but of course it is not plug-in.
I inquired the author about the fact that the differential amplifiers components are not matched, and he replied that he did not notice any bad effect for this.
Thanks for sharing your effort !
Gigi
John Gedde :
Date: February 22, 2019 @ 1:50 am
I have a BioRad 200 mA, 500V power supply that uses a MC1466. Many things were wrong with the supply including a blown MC1466. Rather than buy a replacement of unknown heritage and future availability, I decided this was the way to go. I bought three boards from OSH Park, installed the teeny weeny parts under a microscope and installed it. My supply now works perfectly! Thanks! I may use this little circuit in other applications and designs. Cheers!
eric :
Date: May 3, 2019 @ 10:44 pm
awesome! glad it worked out for you.
Lucio Ghetti :
Date: June 16, 2020 @ 11:48 pm
It’s a beautiful thing, I also need the MC1466l, can you tell me if someone sells the PCB already mounted?, Grazie.
E’ una cosa bellissima, anche io ne ho bisogno di MC1466l, mi puoi comunicare se qualcuno vende il PCB gia montato?, Grazie.